Notes Week 4
The Document Object Model
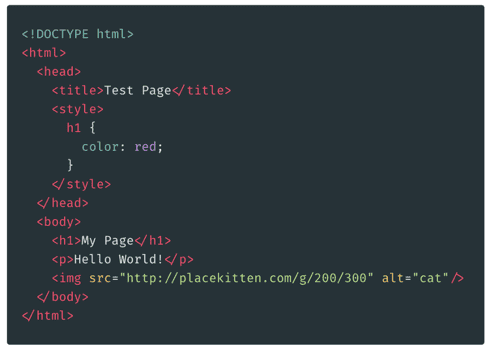
So far in this class, we’ve tended to think of HTML as just being a bunch of text in a flat structure:
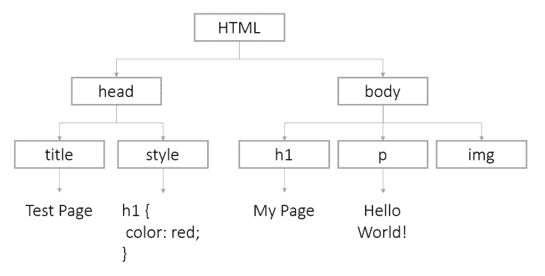
However, it’s also possible to think of an HTML document as being a tree - with multiple “nodes”, which each have a “parent”, and one or more “children”:
A node is a parent of another node if the other node is nested inside of that tag.
By default, our browser will load our HTML and CSS to create a document object, which we can access anywhere in our code. This document object contains a bunch of useful methods, which we can use to select and manipulate elements on the screen.
The Document Object Model just means that we’re able to think of the HTMl file (the document!) as an object, which we can access in our JavaScript code.
Selecting elements with JavaScript
You only really need to know about 3 ways to grab elements on the screen (although there are a bunch of other similar methods).
First off, we have the getElementById() method, which comes with the document object. We simply pass in a string, which could match an element on the page:
// grabs the element with the ID of "my-element"
document.getElementById("my-element")
Secondly, we can use the querySelector() method. This time, we pass in a CSS selector (the same sort of thing that goes at the start of our declaration statement in our CSS file - i.e. #my-id, tagname, .class-name, etc.)
// grabs the first element on the page with
// the class of "highlighted"
document.querySelector(".highlighted")
Finally, we can use querySelectorAll() to grab ALL elements on the page that match the CSS query selector that we pass in as the argument.
// grabs all <p> tags on the page
document.querySelector("p")
This will return a node list (pretty much an array of nodes, which we can iterate through with a for loop).
Changing node attributes
Each of these element selectors (getElementById, querySelector, and querySelectorAll) essentially returns an object, which represents that node on the screen.
Just like any other object, it turns out that we can use the dot notation to change the value of its properties.
It turns out that each property on a node object refers to an attribute defined on the corresponding HTML element. As such, we can simply set attributes like this:
// grabs the element with the ID of "my-element"
const element = document.getElementById("my-element")

// set the element's class attribute to "big"
element.class = "big"
We can also do something similar with our CSS, setting fields on the style object:
// grabs the element with the ID of "my-element"
const element = document.getElementById("my-element")

// set the element's color to yellow
element.style.color = "yellow"
// set the element's background color to blue
element.style.backgroundColor = "blue"
There’s also a handy property called innerHTML that we can set, which overrides anything inside the tag that we selected.
const element = document.getElementById("my-element")

// overwriting
element.innerHTML = "Some totally different stuff"
// adding to the end
element.innerHTML += "Some totally different stuff"
Creating new DOM nodes
We can create a new DOM node inside our JavaScript using the document.createElement() method. We also need to remember to actually add the elements to the screen - which requires us to use the appendChild() method that comes with every node object.
// create a blank p tag
const para = document.createElement("p")
// add some text to that p tag
para.innerHTML = "Here is some nice text"

// grab hold of the element we want to attach it to
const parent = document.getElementById("my-parent")
// add our new p tag to the screen
parent.appendChild(para)
Events
Events in JavaScript are objects which are emitted whenever something happens. Typically, we care about events that are driven by action from our users.
In JavaScript, we can use the addEventListener() method that comes for free from our DOM node objects to “listen for” these events, and execute some code whenever they occur. For example:
// grab DOM node object
const myBtn = document.getElementById("my-btn")

// listen for click events on our button
myBtn.addEventListener("click", function(event) {
  console.log("The button was clicked!")
})
This addEventListener() function here takes 2 arguments. The first argument is the type of event that we’re listening for - in this case a click of the mouse. There are lots of other events that we can listen for - including key presses, changes of values, elements coming into focus, etc.
The second argument to this function is a function which will execute every time the event is triggered - called the event handler function. This function gets access to the event that triggered it, which is an object containing lots of properties giving details about the event.
We can also access the DOM element which triggered the event using the event.target or event.currentTarget property.
Sometimes, elements will have a default behaviour associated with them (e.g. links, when pressed, redirect to another page). We can escape this default behaviour using the event.preventDefault() function at the start of the event handler.
Using events with forms
A common task when building websites is to use forms to get information from the user. A form contains <input> elements, which the user can use to enter some kind of information. These <input> elements have different types, which define how they look.
It turns out that we can get the value of a form through JavaScript, using the value property on input elements. For example:
<form>
  <input id="firstName" type="text" placeholder="First name">
  <input id="lastName" type="text" placeholder="Last name">
  <input id="email" type="text" placeholder="Email address">
  <input id="submitBtn" type="submit" value="submit">
</form>
// grab hold of the submit button
const submitBtn = document.getElementById("submitBtn")
// add a listener on the click event
submitBtn.addEventListener("click", function(event) {
// important - stop the form submitting itself
event.preventDefault()
// get all the user's answers from the form
const firstName = document.getElementById("firstName").value
const lastName = document.getElementById("lastName").value
const email = document.getElementById("email").value
// stitch everything together to make a console log!
console.log("Hi " + firstName + " " + lastName + "! We'll send an email to " + email + " and get your account set up soon!")
})

