Bonus Homework Week 5
Introduction
In week 5, two of the biggest things that we’ve been learning are Object Orientated Programming and loading data from an API. This week’s bonus homework should give you a good opportunity to test both of these concepts out.
We’re going to be creating the frontend for an e-commerce site in this week’s bonus homework!
This will involve grabbing a list of items from a dummy backend and displaying them on the screen. We also have a “cart” section, which will track which items the user has put into the cart, and a “balance”, which will go down when we buy items that are in our cart.
You can check out the finished version of this week’s app here!
As always, if you run into any problems as you’re filling out the homework, then leave me a messahge on the week-5 channel on Discord.
Assignment
1) Set up your development environment | 10 mins OR 2 hours
If you have lots of time for this week’s homework, and you want to practice more with HTML/CSS, then you can build this app from scratch, otherwise you can start off with my starter code here.
We’re copying Google’s Material Design system for the design of this site, which we’ll cover in more detail when we start using React. Material Design assumes that all elements on the page should look like pieces of paper stacked on top of each other. We’re achieving this effect with the box shadow property in CSS, which gives the illusion of some elements being 3D.
If you want to create this yourself, then we’ll need to end up with:
-
A fixed header at the top of the screen with the name of the app.
- You can use the position: fixed CSS style to make something stay in the same part of the screen.
- A fixed sidebar on the right-hand side which contains the user’s wallet balance, the cart, a total of the cart, and some buttons to empty the cart and checkout.
- A wrapped flexbox container in the main content area, meaning that we can keep adding our cards to the same table.
- A list of cards containing an image, a price, a title, and an “Add to cart” button.
We’re also including 2 JavaScript files this time, which we’ll include in our HTML file as usual. One will be called cart.js, which will hold all the code that sets up how our cart should look, and we’ll have one file called index.js, which should be included later, so that it can access this code.
week5-problems
│   index.html
|   main.js
|   styles.css
└───js
│   │   index.js
│ │ cart.js<!DOCTYPE html>
<html>
<head>
<title>Week 5 Problems</title>
<link rel="stylesheet" href="styles.css" />
</head>
<body>
<script src="js/cart.js"></script>
<script src="js/index.js"></script>
</body>
</html>2) Load in data from our fake API | 15 mins
As a first step for this project, I want us to get a hold of the data that we’re working with. We have a fake API that we can make use of, containing routes for some common e-commerce-related resources. You can see the full documentation for the API here.
From this week’s lecture, you might remember that we had some code that looks like this for making a GET request:
fetch("path/to/api")
  .then(response => response.json())
  .then(data => data)
  .catch(error => {
    console.log(error)
  })
We’ll just be making use of the GET route to /products for this project - which will allow us to get back some JSON data for items that will go in our store.
Use the fetch API to load in the data from the GET /products endpoint. You’ll want to use the URL of https://fakestoreapi.com/products.
You can either use the async/await syntax or the .then()/catch() syntax to get a hold of this data.
Once the data has been loaded in, make a console log of it, and take a look at it in the browser.
3) Create an HTML element for each product in our store | 20 mins
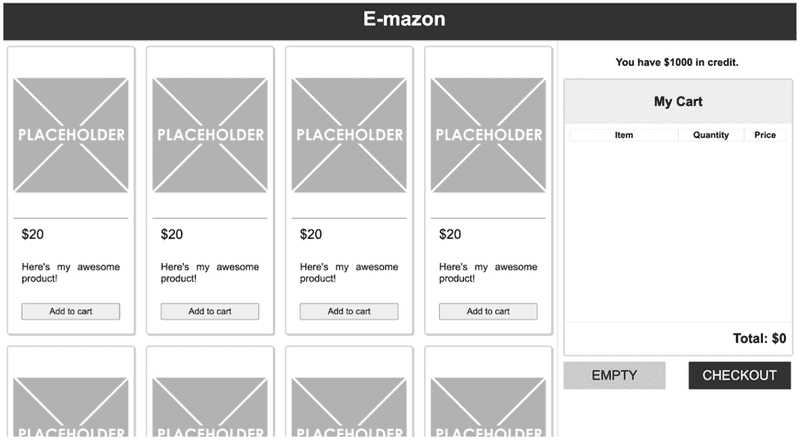
Now that we have the data loaded in, we can start to use that data to populate the content of our app. At the moment, we just have these dummy cards on the screen, which don’t correspond to actual items in a shop:
In this step, I want us to replace those dummy cards with cards representing the data that we just loaded in. To do this, we’ll be looping over our array of data, and doing some DOM manipulation for each each item.
Create a function called createCard(), which should take a product object as an argument, and create a new card for that product on the screen.
You’ll want to use the document.createElement() and element.appendChild() functions from last week to do this, and you can start off with the HTML code for one of these cards in your index.html file to give you a head start. A simple way of doing this is to use ES6 template strings (`like this! ${someVariable}`), and use the element.innerHTML property to write this HTML for you.
Keep all ID and class names the same, so that the CSS still works, and replace the image src/alt, the price, and the title with information from the product object.
Add the new card element to the HTML element with the ID of cards-container once it has been set up. Call this new function for every item in the data array that you loaded in from step 3.
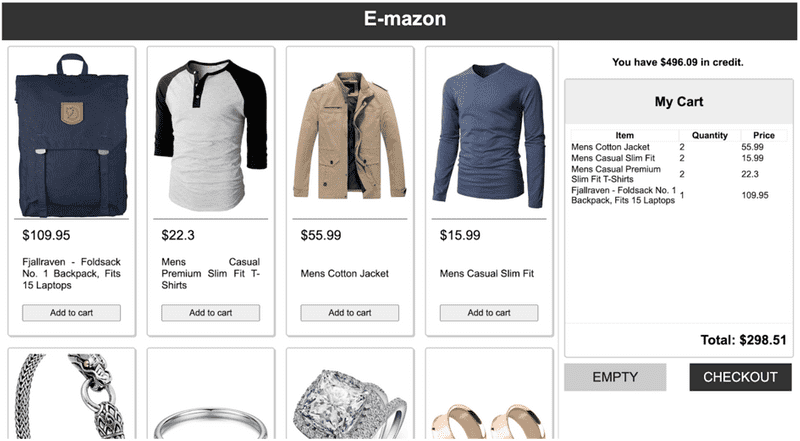
At this point, we should hopefully have something that looks like this, with real-looking products in our store!
4) Create a class for the cart | 30 mins
Declare a Cart class in the cart.js file, and make a new instance of this cart class in your index.js file, as soon as your data has been loaded in.
Your cart class should include:
- An
itemsproperty, which should be an array of items that are in the cart. -
An
add()method, which adds a new product to the list of items in the cart.- If there is already an item in the cart with the same ID, then increase the quantity of that item. Otherwise, add a new item with a quantity of 1.
- Hint: you can use the
Array.find()prototype method to search for whether a product has already been added to the list of items.
- An
empty()method which clears the list of items in the cart. - A
calculateTotal()method, which makes a sum total of all the items in the cart (their price * quantity). -
An
update()method, which overwrites the content of the rows that are currently in the cart with new values.- The logic here is that calling
myCart.update()should remove everything inside thetbodytag inside the cart’s table, and then loop through everything in the items array, adding a row for each item. - This method should also update the sum total at the bottom of the cart.
- You’ll want to call this
update()method every time we add or remove elements from the cart.
- The logic here is that calling
Once the cart class has been set up, make a new instance of the cart inside of your then() callback function, after you’ve loaded in your data. We’ll be using this cart object in the next couple of steps.
5) Add event listeners to the “Add to cart” buttons | 20 mins
Now that our cart object has been set up, the next step should be to add an event listener to each of our product cards, which should add one of that product to our cart.
Add an ID to each of the buttons inside the createCard() function which matches the product that we’re looking at.
Inside of the for/forEach loop when you’re calling createCard, create a new event listener for each button after the card has been added to the screen, which should call the cart’s add() method, passing in the product that we’re looking at.
Make sure this is working as expected, and that clicking one of the buttons adds a new table row onto the screen.
At this point, we should be able to get some output like this after clicking some of these buttons a few times:
6) Add event listeners to the cart buttons | 20 mins
Now that we can add items to our cart, and everything updates as expected, the last step will be to configure the buttons underneath the cart card.
- When the user clicks on the “empty” button, this should clear all the items from the cart - essentially resetting the page.
- When the user clicks on the “checkout” button, this should update the user’s wallet balance at the top of the cart sidebar, empty all the items from the cart, and send an alert to the user, saying that their items are on the way.
- You’ll want to create a wallet balance variable, which should update every time the checkout button gets pressed.
- If the user doesn’t have enough funds in their wallet, then you shouldn’t let them checkout! If that happens, then give a message that tells them to empty their cart and try again.
At this point, the whole application should be working as expected! Give yourself a pat on the back if you managed to get this far!
7) Watch/read the following materials | 1 hour 40 mins
As a final step, here is a list of extra materials which might be interesting.
- [Video] Inheritance in JavaScript | The Coding Train | 20 mins
- [Video] Async JS Crash Course | Brad Traversy | 24 mins
- [Video] Reduce basics | Fun Fun Functions | 10 mins
- [Video] Reduce Advanced | Fun Fun Functions | 14 mins
- [Video] Recursion | Fun Fun Functions | 16 mins
- [Video] This Video Has XX,XXX,XXX Views | Tom Scott | 16 mins


